Getting Started
In this article you'll learn how to setup your development environment, create your first Stream Deck plugin, and test your plugin in Stream Deck.
Installation
Prerequisites
Developing plugins with the Stream Deck SDK requires:
- Node.js version 20 or higher.
- Stream Deck version 6.4 or higher.
- Stream Deck device.
- Text editor, VS Code is recommended.
- Terminal for accessing the Stream Deck command line interface (CLI).
Learn more about installing Node.js.
Installing Node.js is best achieved with a Node version manager, such as:
- nvm for macOS
- nvm-windows for Windows
With one of the aforementioned nvm(-windows) installed, run the following commands:
Install Node.js:
Terminalnvm install 20Switch to the installed version of Node.js:
Terminalnvm use 20Restart your terminal and verify the version of Node.js is at least version 20:
Terminalnode -v
For more information on installing Node.js on Windows, we recommend Microsoft's how-to Install Node.js on Windows, or Node.js' download page.
If you do not own a Stream Deck device, you can try Stream Deck Mobile for free.
Setup Wizard
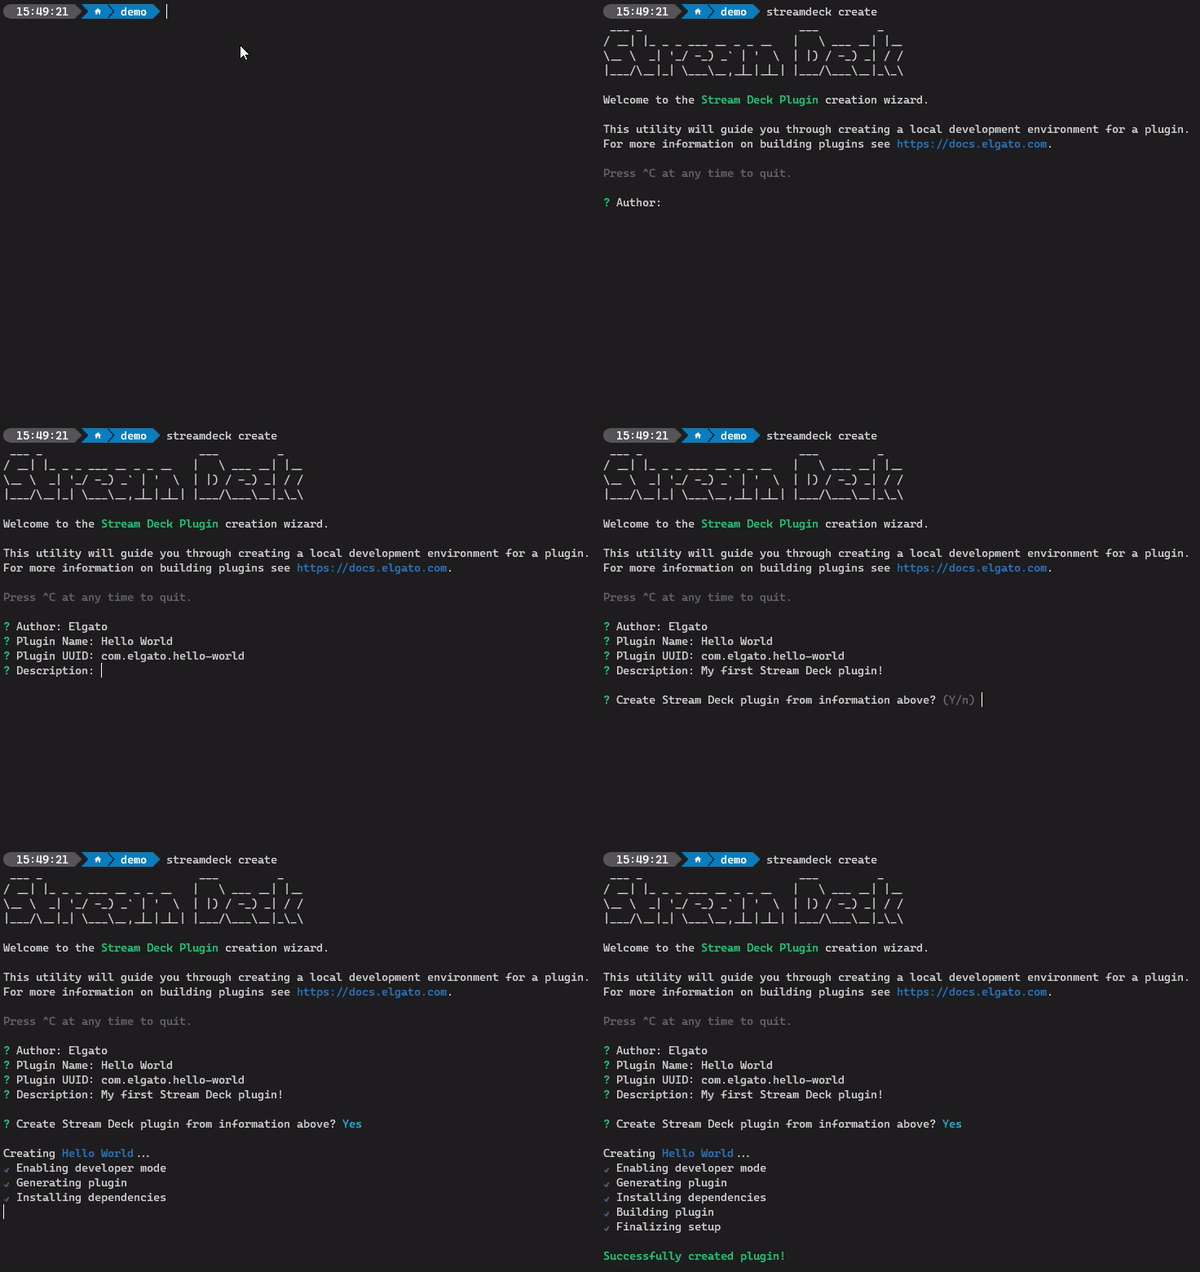
The Stream Deck SDK is supported by a CLI, called the Stream Deck CLI. As part of the Stream Deck CLI, there is a command line plugin creation wizard for easily scaffolding a basic Stream Deck plugin.
First, install the Stream Deck CLI by running the following command.
- npm
- yarn
- pnpm
npm install -g @elgato/cliyarn global add @elgato/clipnpm add -g @elgato/cliThen, run the create command:
streamdeck create
Your plugin's UUID is a reverse-DNS format string, unique to your plugin, that reflects your organization and the product your plugin is intended for, for example:
- com.obsproject.obs-studio
- com.youtube.live
- tv.twitch.studio
Plugin UUIDs must only contain lowercase alphanumeric characters (a-z, 0-9), hyphens (-), and periods (.). Once published on Marketplace, your plugin's UUID cannot be changed.
File Structure
After completing the plugin creation wizard there will be a new directory, with the name of your plugin, that contains:
.
├── *.sdPlugin/
│   ├── bin/
│   ├── imgs/
│   ├── logs/
│   ├── ui/
│   │   └── increment-counter.html
│   └── manifest.json
├── src/
│   ├── actions/
│   │   └── increment-counter.ts
│   └── plugin.ts
├── package.json
├── rollup.config.mjs
└── tsconfig.json
.sdPlugin
The ./*.sdPlugin directory is your compiled plugin, and contains:
bin, compiled output files from your./srcdirectory.imgs, supporting images distributed with your plugin.logs, logs generated with a logger.ui, property inspectors, allowing users to configure actions in Stream Deck.manifest.json, that defines the metadata of your plugin, learn more about the manifest.
src
The ./src directory contains the source file for your Stream Deck plugin and is configured to a Node.js environment. As part of the scaffolded plugin, the directory contains:
index.ts, the entry point of your plugin.actions/increment-counter.ts, an example action that displays a count.
Running Your Plugin
In addition to your plugin files, the setup wizard will have pre-populated npm scripts in package.json to assist with building and developing your plugin:
{
	"scripts": {
		"build": "rollup -c",
		"watch": "rollup -c -w --watch.onEnd=\"streamdeck restart {{YOUR_PLUGIN_UUID}}",
	},
	// ...
}
To start developing your plugin, run the following command:
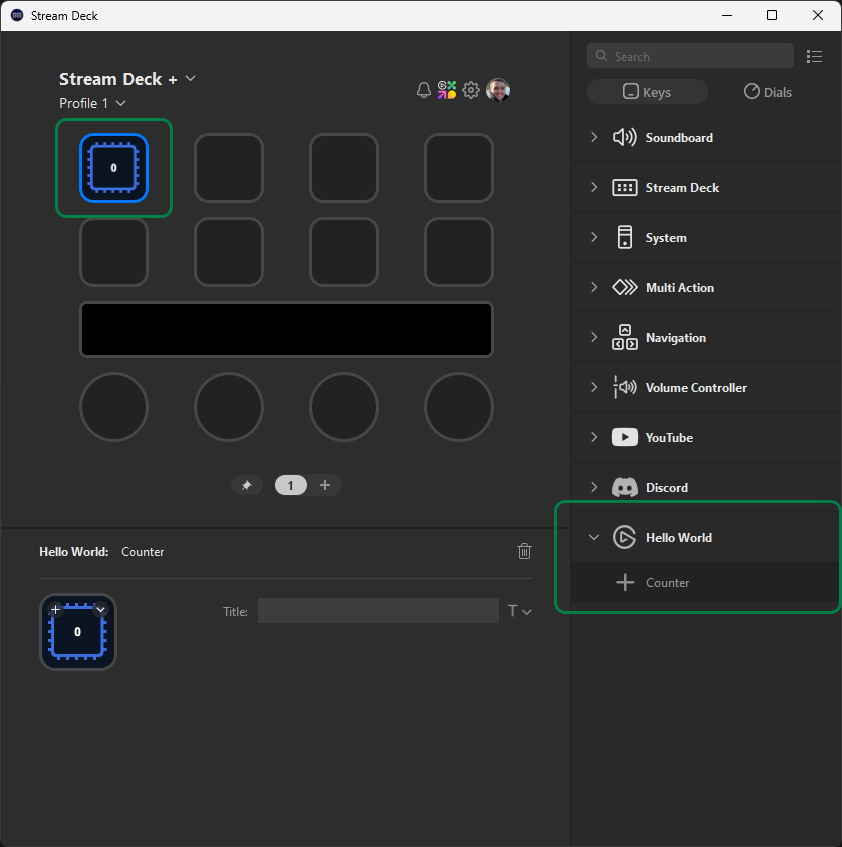
npm run watchYou should now see your plugin in Stream Deck.

Whilst running the npm run watch command, any changes you make to ./*.sdPlugin/manifest.json or ./src will automatically be reflected in Stream Deck. To stop watching for changes, press Ctrl + C.
Congratulations, you've just created your first Stream Deck plugin! 🎉
If your plugin is not showing within Stream Deck, this may be due to the app running with elevated privileges. This occurs after a fresh install, or update, of the Stream Deck app; restarting the app should resolve the issue. For further help, our community Marketplace Makers Discord is also available.
What's Next?
- Make your first changes.
- Learn more about actions and how you can expand your plugin's functionality.
- Discover property inspectors, allowing users to configure your plugin in Stream Deck.
- Explore more commands available within the Stream Deck CLI.